Every plant has its own distinctive leaves. The colour of the leaf, its size in relation to that of the Flower and how it is connected to the plant from the stem or direct from the ground are all equally important factors to consider.
l. This leaf is a single centre-ribbon stitch.

2. This is a similar but much larger. version of leaf 1. it consists of a left and right-ribbon stitch worked together.

3. This leaf is worked with three center ribbon stitches fanning out from the base.

4. This leaf also consists of three ribbon stitches. but it has straight stitches worked with six strands of toning embroidery thread that are placed to mirror the ribbon stitches.

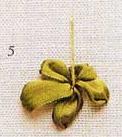
5. These leaves are straight stitches, each worked From the centre out to the tip, with the ribbon controlled over it second needle .
6. Although this is not strictly a leaf, moss can be very useful in a garden design. This example is worked in thread with one- and two-loop French knots.

7. Another leaf worked with ribbon stitches.


9. A similar shape to example 8. but, here, each leaf is worked with a ribbon stitch.

10. Another variation of straight-stitch leaves.

11. 1 associate this special shape with a fem. and create it with a gathered ribbon stitch. To work this example, start by working a 4cm length of gathering stitches through the centre of a long length of 7mm ribbon, Mark two dots on the fabric. 3cm apart, to indicate the length of the leaf.
then anchor the knot end of the gathering at the stem end of the leaf. Work a a ribbon stitch at the other end.
leaving the gathering thread on the front of the fabric. Pull this thread to create the leaf shapes. then use it to secure the- ribbon. Use the same thread to stitch along the gathered line to create a vein and to hold the leaf down on the fabric.

12. These ivy leaves are small versions as example 3.

13. This holly leaf is worked in a similar manner to leaf 11, but the ribbon is not gathered. Start by marking two dots for the length of the leaf, 2cm apart, on the fabric.
Anchor the ribbon at the stem end. hold the ribbon flat, put the needle into the ribbon 3cm away from the anchored end. then pass the needle through the second dot to leave a loop. Anchor this end of the ribbon, then work a row of back stitches along the centre of the ribbon, puckering it to flatten the loop along its length. Work a

14. These leaves are all straight stitches.

L5. I know that a fir cone is not a leaf but it does have an interesting shape. and it is a must with holly and mistletoe. It is somewhat difficult to embroider, so practise first. Lightly draw the cone shape on to the fabric. anchor the ribbon at point A. then work modified lazy daisy stitches. through points B. C, D. E. E etc.. as shown below. keeping a fairly loose tension.


16. This cow parsley comprises a series of straight stitches worked with two strands of thread for the main stem and one for all the others.

17. Grasses are always useful. In this example, the blades of grass are all straight stitches worked with different types and colours of threads.

These leaves are straight stitches, each worked From the centre out to the tip, with the ribbon controlled over it second needle . Jason Robinson
ReplyDelete