The unique feature of this table cover is that it is made with a 'quilt as you go technique. When the piecing is finished, the project is finished!

Note: Instructions are given in Imperial and metric. Make a template for the large and small hexagon from the thick template plastic before beginning to cut the fabric.
Cut the fabric
From the dark fabric cut:
• 2 squares, 20in x 20in (50cm x 50cm)
from the cream background fabric, Cut:
• 54 large hexagons
From each of the assorted fabrics, cut:
• 6 small hexagons
From the thin batting, cut:
• 1 square, 20in x 20in (50cm x 50cm)
• 54 small hexagons
Make the centre appliqué
1. Trace the design onto tracing paper using a medium-tipped permanent marker. Trace the design onto the dark fabric Square with a white or yellow pencil. The pen draws a clear line that dries white or yellow. Any lines not necessary for the final tracing can easily be removed, as the lines are water soluble.
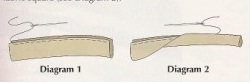
2. For the stems. cut (2.25cm) wide bias strips from the green fabric. fold the strip in half and hold it in place with a running stitch see Diagram 1. Position the raw edges just inside the stem line on the pattern, roll the folded edge back over the seam allowance and applique the fold to the dark fabric square (see Diagram 2).
 3. For the flowers and cream shapes, trace and cut out each shape on the thin template plastic. Draw around each template on the right side of the chosen appliqué fabrics. Cut out the shapes leaving less than (7.5mm)seam allowance. Spray he pieces lightly with some spray starch and press, Finger press the seam allowance around each piece along the stitching line before placing it on the dark fabric square to applique.
4. Applique the cream shapes in position on the dark fabric square. For the cut out sections, carefully cut a slit in the centre of each curved wedge and cut to the seam line. Using your needle, turn the Seam allowance under to reveal the dark fabric underneath. Use small applique stitches to stitch in place.
5. For the small circles. use a small metal washer or cut a template of the small Circle shape. Cut circles from blue fabric with less than (7.5mm) seam allowance. Stitch a row of running stitches around the edge. Place the metal washer or template in the centre of the fabric circle and pull up the running stitches tightly. Press the back firmly. Carefully ease Out the washer. keeping the circle shape. Applique the circle in position to the dark fabric square. Complete 12 circles.
Complete the centre
1. Layer the remaining dark fabric square, the square of thin batting and the completed applique centre together. Baste the three layers together with a 3in (7.5cm) grid.
2. Quilt the centre, outlining each shape in the ditch or as desired. Remove basting stitches.
3. Cut the batting to the exact size of the finished centre. Cut the applique centre square and dark fabric backing square(1.5cm) bigger all around. Press the seam allowance under on the backing square. Press the seam allowance of the appliqued centre around the batting. Slipstitch the two folded edges together.
Construct the hexagons
1. In the centre of each large hexagon on the wrong side of the fabric draw the small hexagon shape.
2. Using a generous amount of spray starch, press the raw edges of the large hexagons to within in oi the drawn (1/8in) of the small hexagons.

3. Press the folded edges of each large hexagon towards the centre again, this time on the drawn line.
4. Layer the large hexagon (wrong side up). the batting and the small hexagon (right side up) together. Place a small hexagon in the centre of each large hexagon.
5. Applique the folded edges of the large hexagon to the small hexagons.

6. Stitch a single row of quilting Close to the appliqued edges on the small hexagons. Make 12 hexagons in this way for the first row using 2 fabrics.
Assemble the table cover
1. Place the appliquéd centre on a flat surface. Put the hexagons for the first row in place butted up against the adjacent hexagons and the centre, alternating the fabrics. Hold the hexagons in place using masking tape.
2. Turn over the centre and attached hexagons and ladder stitch the hexagons to each other and the centre. Remove the masking tape.
3. Make the second round in the same manner, making 18 hexagons using 3 fabrics.
4. Make the third round, making 24 hexagons using 4 different fabrics.

Finished size:
50in (128cm) diameter
Materials
50cm dark fabric for centre background
2.2m cream background fabric for large hexagons
30cm each of 19 assorted fabrics for small hexagons
Small pieces of fabric for appliqué
White or yellow pencil or white pen
Fine and medium permanent felt pens
Tracing paper (optional)
Thin template plastic
Thick template plastic for hexagon templares
Scissors, embroidery and paper
Needles, applique and quilting
Range of coloured threads for applique
Spray starch and masking tape
Thin batting such as Pellon

Note: Instructions are given in Imperial and metric. Make a template for the large and small hexagon from the thick template plastic before beginning to cut the fabric.
Cut the fabric
From the dark fabric cut:
• 2 squares, 20in x 20in (50cm x 50cm)
from the cream background fabric, Cut:
• 54 large hexagons
From each of the assorted fabrics, cut:
• 6 small hexagons
From the thin batting, cut:
• 1 square, 20in x 20in (50cm x 50cm)
• 54 small hexagons
Make the centre appliqué
1. Trace the design onto tracing paper using a medium-tipped permanent marker. Trace the design onto the dark fabric Square with a white or yellow pencil. The pen draws a clear line that dries white or yellow. Any lines not necessary for the final tracing can easily be removed, as the lines are water soluble.
2. For the stems. cut (2.25cm) wide bias strips from the green fabric. fold the strip in half and hold it in place with a running stitch see Diagram 1. Position the raw edges just inside the stem line on the pattern, roll the folded edge back over the seam allowance and applique the fold to the dark fabric square (see Diagram 2).
4. Applique the cream shapes in position on the dark fabric square. For the cut out sections, carefully cut a slit in the centre of each curved wedge and cut to the seam line. Using your needle, turn the Seam allowance under to reveal the dark fabric underneath. Use small applique stitches to stitch in place.
5. For the small circles. use a small metal washer or cut a template of the small Circle shape. Cut circles from blue fabric with less than (7.5mm) seam allowance. Stitch a row of running stitches around the edge. Place the metal washer or template in the centre of the fabric circle and pull up the running stitches tightly. Press the back firmly. Carefully ease Out the washer. keeping the circle shape. Applique the circle in position to the dark fabric square. Complete 12 circles.
Complete the centre
1. Layer the remaining dark fabric square, the square of thin batting and the completed applique centre together. Baste the three layers together with a 3in (7.5cm) grid.
2. Quilt the centre, outlining each shape in the ditch or as desired. Remove basting stitches.
3. Cut the batting to the exact size of the finished centre. Cut the applique centre square and dark fabric backing square(1.5cm) bigger all around. Press the seam allowance under on the backing square. Press the seam allowance of the appliqued centre around the batting. Slipstitch the two folded edges together.
Construct the hexagons
1. In the centre of each large hexagon on the wrong side of the fabric draw the small hexagon shape.
2. Using a generous amount of spray starch, press the raw edges of the large hexagons to within in oi the drawn (1/8in) of the small hexagons.

3. Press the folded edges of each large hexagon towards the centre again, this time on the drawn line.
4. Layer the large hexagon (wrong side up). the batting and the small hexagon (right side up) together. Place a small hexagon in the centre of each large hexagon.
5. Applique the folded edges of the large hexagon to the small hexagons.

6. Stitch a single row of quilting Close to the appliqued edges on the small hexagons. Make 12 hexagons in this way for the first row using 2 fabrics.
Assemble the table cover
1. Place the appliquéd centre on a flat surface. Put the hexagons for the first row in place butted up against the adjacent hexagons and the centre, alternating the fabrics. Hold the hexagons in place using masking tape.
2. Turn over the centre and attached hexagons and ladder stitch the hexagons to each other and the centre. Remove the masking tape.
3. Make the second round in the same manner, making 18 hexagons using 3 fabrics.
4. Make the third round, making 24 hexagons using 4 different fabrics.
No comments:
Post a Comment